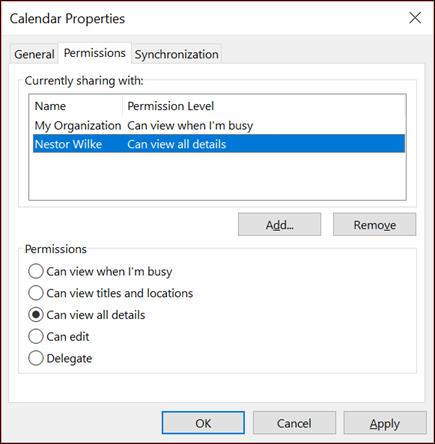
Important: Use caution when sharing your calendar and choose what others can access. Anyone with full access permissions to your calendar will be able to:

  • respond to invitations
  • create and edit events
  • share your calendar with others
  • receive emails about changes to your calendar
  • delete your calendar

Tip: If your account is managed through work or school, your account’s admin may have limited or turned off sharing outside of the organization. To learn more, contact your admin.

Share your calendar

You can share any calendar you created, and you can set different access permissions for each calendar. Learn how to create a new calendar.

Share a calendar with specific people

  1. On your computer, open Google Calendar. You can’t share calendars from the Google Calendar app.
  2. On the left, find the “My calendars” section. To expand it, click the Down arrow Down arrow.
  3. Hover over the calendar you want to share, and click More More and then Settings and sharing.
  4. Under “Share with specific people,” click Add people.
  5. Add a person’s or Google group’s email address. Use the drop-down menu to adjust their permission settings. Learn more about access permissions.
  6. Click Send.
  7. The recipient will need to click the emailed link to add the calendar to their list. Learn how to add someone else’s calendar.

Tip: To share a calendar that you don’t own, you need to ask the owner to give you “Make changes and manage sharing” permission.

Share a calendar with the public

  1. On your computer, open Google Calendar. You can’t share calendars from the Google Calendar app.
  2. On the left, find the “My calendars” section. To expand it, click the Down arrow Down arrow.
  3. Hover over the calendar you want to share, and click More More and then Settings and sharing.
  4. Under “Access permissions,” select Make available to public.
  5. Next to “Make available to public,” choose the level of access you want to give in the drop-down menu. Learn more about access permissions.

Tip: The only way to let people who don’t have Google Calendar view your calendar is to make it public. Learn more about sharing publicly.

Share a calendar with everyone in your organization

If you use Google Calendar through your work, school, or other organization, you’ll find the option to make your calendar available for everyone in your organization under “Access permissions.” Learn more about access permissions.

How this setting works

  • People in your organization can find your calendar.
  • People outside your organization won’t be able to find your calendar.
  • If you invite someone outside your organization to a meeting, they can view information about the meeting.

If you have an Exchange, Microsoft 365, or Outlook.com account, you can send a sharing invitation to other users so they can view your calendar in their own Calendar list.

Calendar sharing isn’t limited to the default Calendar folder that is created in all Outlook profiles. You can create additional calendar folders and choose which of those folders to share. For example, you can create a calendar folder for a specific project and share it with your co-workers. Optionally, you can grant them permission to modify the events and appointments in the calendar.

Share your Microsoft 365 or Outlook.com calendar with people inside or outside your organization

  1. From your Calendar folder, on the Home menu, select Share Calendar.Share your calendar with another person.
  2. Choose the calendar you want to share from the drop-down menu.
  3. In the Calendar Properties dialog box, click Add.
  4. You can search for people from your address book or type in their email addresses in the Add box. When you’re done adding names in the Add Users dialog box, click OK.
  5. Back in the Calendar Properties dialog box, select the person’s name or email address, then choose the level of details that you want to share with the person, then click OK.Choose the permissions for each person.
  6. The person you’ve shared your calendar with will receive a sharing invitation by email.
  7. Once the recipient clicks Accept, they’ll see your shared calendar in their calendar list.

I see a “This calendar can’t be shared” error

If you see a message that says This calendar can’t be shared, there are three possible reasons.

  • The email address is invalid.
  • The email address is an Microsoft 365 Group
  • The email belongs to an external user who isn’t part of your organization.

What permissions people have to your calendar

You can choose from several different permission levels when sharing your calendar.

  • Can view when I’m busy. Those sharing your calendar with this permission level can only see which times you’re available, like this:What your calendar looks like to the person you shared it with.
  • Can view titles and locations. Those sharing your calendar with this permission level will see availability and the subject and meeting location, like this:What your calendar looks like to a user when you share it with limited details.
  • Can view all details. Those sharing your calendar with this permission level will see all details of your appointments, just like what you see.

Stop sharing your calendar

At any time you can revoke access to your calendar. Note that it may take a while for Microsoft 365 and the user’s Outlook to sync and remove the view to your calendar.

  1. Click Calendar.
  2. Click Home > Calendar Permissions.
  3. On the Permissions tab, click the user’s name and then choose Remove.
  4. Click OK.

Share a calendar by publishing it to a web page

If you have access to a web server that supports the World Wide Web Distributed Authoring and Versioning (WebDAV) protocol, you can publish your calendar there.

Note: Not sure if your server supports WebDAV? Your server administrator or internet service provider (ISP) should be able to tell you.

  1. Click Calendar.Calendar command
  2. Click Home > Publish Online > Publish to WebDAV Server.

    Notes:

    • If your email account uses Exchange, you will see Publish This Calendar, instead of the option to publish to a WebDAV server. This lets you publish your calendar directly to an Exchange Server. In the window that opens, select the publishing options you want, and click Start Publishing.
    • If you’re using Microsoft 365, you can still publish your calendar to a WebDAV server, but you must first remove {Anonymous:CalendarSharingFreeBusySimple} from the sharing policy. This will prevent you from publishing your calendar to Exchange in the future, however.
  3. In the Location box, enter the location of the WebDAV server, select any other publishing options you want, and then click OK.

Share your calendar in an email

If you don’t want to give someone permissions to share your calendar and see updates, you can email a static copy of your calendar for a specific date range. The recipient will be able to see the events on your calendar at the time you sent the email, but not any updates you make after you send the email.

Note: This feature is no longer available with Outlook for Microsoft 365.

  1. Click Calendar.Calendar command
  2. Click Home > E-mail Calendar.On the Home tab, click E-mail Calendar
  3. In the Calendar and Date Range boxes, pick the calendar and time period you want to share. For example, choose Today only or for the Next 7 days.In the Calendar and Date Range boxes, pick the options you want
  4. Set any other options you want, and then click OK.
  5. In the new email that opens, add who you want the message to go to in the To field, add a message if you want, and click Send.

The person you sent your calendar to will see a snapshot of your calendar in the message.

Example of a calendar shared in an email

The message also includes an attached iCalendar (.ics) file that they can open in Outlook or another calendar program. When the recipient clicks the iCalendar file, Outlook displays the file as a new calendar that they can view side-by-side with their calendar. They can drag appointments or meetings between the two calendars, and find a time that works for both of you.

Fix issues sharing your calendar

If you don’t have the option to share your calendar (it’s greyed out), it’s because the admin/IT support for your business has set a policy to prevent the people from sharing calendars.

When you share your Outlook.com calendar with people, they’re able to add it directly to their calendar view in Outlook. Depending on the permission you give them, they can view your calendar or edit it. You can also share your Outlook.com calendar with others by publishing your calendar and sending them a link to a webpage or a file.

If your Outlook.com calendar won’t sync in Outlook on Windows or you can’t edit a shared Outlook.com calendar in Outlook on Windows, see My Outlook.com calendar won’t sync or I can’t edit a shared Outlook.com calendar.

Note: Sign in to Outlook.com using any Microsoft account, including email accounts ending in @outlook.com, @live.com, @hotmail.com or @msn.com. If you have an Microsoft 365 work or student account, see Share your calendar in Outlook on the web for business.

Share Your Calendar

  1. At the bottom of the page, select Calendar to go to Calendar.
  2. At the top of the page, select Share, and choose the calendar you want to share.

    Note: You can’t share calendars owned by other people.

  3. Enter the name or email address of the person with whom you want to share your calendar.
  4. Choose how you want this person to use your calendar:
    • Can view all details lets the person see all the details of your events.
    • Can edit lets the person edit your calendar.

Notes:

  • When sharing your calendar with non-Outlook.com users, such as Gmail users, they will only be able to accept the invitation using an Outlook.com or an Microsoft 365 account.
  • Calendar items marked private are protected. Most people with whom you share your calendar see only the time of items marked private, not the title, location, or other details. Recurring series marked as private will also show the recurrence pattern.Select Share. If you decide not to share your calendar right now, select Remove .

Publish Your Calendar

In Calendar settings, you can publish your calendar so anyone can view your calendar or subscribe to it.

  1. In Calendar view, select Settings Settings > View all Outlook settings.
  2. Select Calendar > Shared calendars.
  3. Under Publish a calendar, choose which calendar you want to publish and how much detail people can see.
  4. Select Publish.
  5. If you choose an HTML link, recipients can copy and paste the URL in a browser to view your calendar in a new browser window.If you choose an ICS link, recipients can download the ICS file and import it into Outlook. This will add your events into their calendar, but recipients won’t automatically receive any updates to your calendar. Alternatively, recipients can use the ICS link to subscribe to your calendar through Outlook. They’ll see your calendar alongside their own and will automatically receive any updates to your calendar.

Notes:

  • HTML and ICS calendars are read-only, so recipients won’t be able to edit your calendar.
  • How often your ICS calendar syncs depends on the recipient’s email provider.

Share Article

Related Articles

Calendar

Subscribe to someone’s Google Calendar

Tools + Resources

Social Media Image Sizes

Freelance Hourly Rate Calculator

Still haven’t found what you’re looking for?

Let us know and we’ll do our best to help out!

sit back and relax

We have monthly site maintenance options to ensure that your website is running smoothly.

Website development post-launch support and resources