Redirection enables you to forward one URL to another. It’s a handy way of sending both users and search engines to a different URL and allows you to preserve your search engine rankings for a particular page.
It’s also a useful way to preserve the “link juice” of out-of-date content by redirecting old pages or posts to new ones with new information.
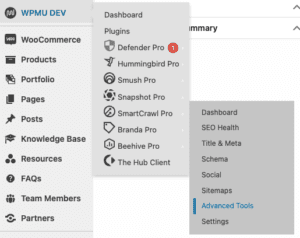
You can access your site redirect panel by going to either WPMU DEV > SmartCrawl Pro > Advanced Tools, if you have a site built by Vigilante Marketing, then select URL Redirection from the tabs.
Add a redirect
To add a new redirect, click the Add Redirect button at the top of the screen to open the options modal.

Then enter the URL you want to redirect – Old URL – and where you want to redirect it to – New URL. Note that the URLs can be either relative to your domain – /cats – or absolute URLs – https://yoursite.tld/cats.
Your redirect URLs can contain query strings as well. For example, you can take an old URL like this:
https://shop.example.com/?add-to-cart=5757&code=WKLL-ALL-15730
And redirect to a new URL with the same or different query string like this:
https://newstore.com/?add-to-cart=745&code=50OFF-ALL-6735
Select the Redirect Type if it’s different from what you set as the default (see Default Redirection Type below).

Advanced Options
Click the Advanced header in the modal to reveal additional options:
- Label – Add an optional label to your redirect if you have long URLs or several similar ones so you can easily tell them apart.
- Regular Expressions – If your URL contains a regex pattern, be sure to specify that here by clicking the Regex option. See About Regex Redirects below for more.

Once you’re done, click Save.
To Edit or Remove a redirect you’ve added, click the gear icon in its row and select the appropriate option.

About Regex Redirects
SmartCrawl supports regex patterns in your redirects. Regex is short for regular expression, which is a handy shorthand that can be used to match numerous URLs using a single string of text.
Query Strings & Regex
Please note that while query strings in URLs are supported for normal redirects as noted above, they are not yet supported in regex redirects. This feature will be included in a future update.
To illustrate how powerful regex can be, let’s say you wanted to catch all URLs containing the distinct word cats anywhere in the URL, and redirect all of them to a /cats-new/ post instead. For example:
yoursite.tld/cats
yoursite.tld/old-cats
yoursite.tld/cats-here
yoursite.tld/old-cats/here
yoursite.tld/even-more/old-cats
yoursite.tld/still/more/cats/here/too
You could create a separate redirect for each one, but if you have dozens or hundreds of such URLs, that can get quite tedious. The easy alternative is to “catch” all of them with a regex pattern like so:
yoursite\.tld\/(?!cats-new\/|cats-new$).*\bcats\b.*
This pattern would match all of the above URLs. But it would not match any of the following URLs, as the letter combination c-a-t-s in each one is actually part of a different word.
yoursite.tld/ducats
yoursite.tld/catsup
yoursite.tld/scats
It would also not match the URL you’re redirecting to, which also contains the word cats, as that would cause an endless redirect loop:
yoursite.tld/cats-new
Here’s a quick breakdown of how the above regex works.
The first part of the expression checks if the URL is exactly where you want to redirect all your stuff (in our example, that’s /cats-new/) and if it is, do not redirect. That little bit of magic happens with a negative lookahead – ?! – to exclude that particular pattern.
(?!cats-new\/|cats-new$)
The second part of the expression says to match any combination of characters (the .* tokens) before and/or after the explicit word cats (indicated by enclosing the word in \b tokens).
.*\bcats\b.*
Note that regex is also supported in the target or destination URL that you’re redirecting to.
For example, let’s say you just changed a post category on your site from cats to felines, but have a ton of old cats links that your users have shared on social media.
You could create a redirect to catch all those inbound links, like so:
https://yoursite.tld/cats/(.+)
Where anything after cats in the URL is identified as a capture group by enclosing it in parentheses. The (.+) will match any number of any characters, so should catch all old links to posts in that old category.
Then redirect them to the corresponding new category URLs, like so:
https://yoursite.tld/felines/$1
The $1 token will match whatever is in the capture group in the old URLs.
If you’re new to regex and want to get a feel for the basics, see this excellent article: Regular Expressions for Non-Programmers.
We suggest using a handy tool like this one to help you build & validate your regex patterns: https://regex101.com/
Bulk Options
You can also bulk delete or bulk update multiple redirects that you’ve already set up. To bulk update multiple redirects and point them all to the same URL, select them from your list and click the Bulk Update button.

Enter the new URL you wish to redirect them all to, and click Apply.

Import & Export
This feature enables you to create a CSV file with all the redirects you need and import that file to get them all set up in a single click.
Or you export redirects from one site and import them into another one if you have multiple sites using the same relative URLs.

To export your redirects, click the Export button at the top of the screen to download a CSV file of all redirects from your site.
To import redirects into a site, click the Import button. In the modal window that pops open, click the Upload button and navigate to the CSV file on your computer that you wish to import, then click Import.
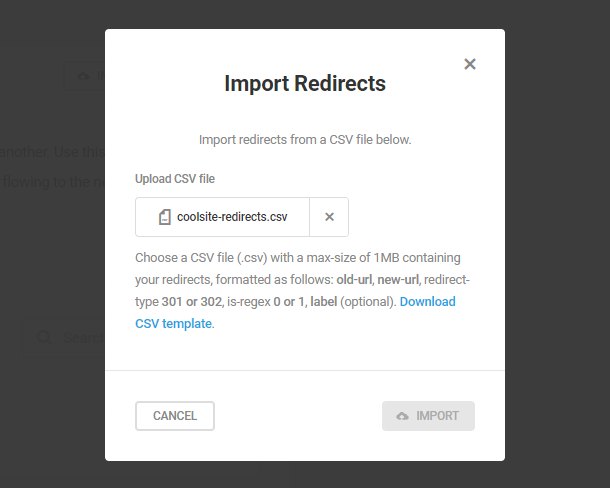
If you need a template to create a new CSV file of redirects you wish to import, simply click the Download CSV template link in the modal. You can then add all the redirects you need and import that file.
Settings

Redirect Attachments
Did you know that each time you upload a file to the WordPress Media Library and choose Link to: Attachment Page, WordPress creates a separate media attachment page for every single file? This page contains nothing except the media content and has its own generated URL.
In most cases, this page isn’t particularly beneficial, which is why you might want to redirect WordPress attachment pages to the original post or page that the file is attached to.
Separate media pages may work for photographers and graphic designers, as they help to create galleries but, for an average WordPress user, it makes sense to redirect WordPress attachment pages to the posts or pages that they belong to (improving SEO in the process).
Let’s say you create a post and add three images as Link to: Attachment Page to it. WordPress then automatically creates four URLs, three for the images, and one for the original post. This can hurt SEO in more ways than one:
- Google may start bringing more traffic to the attachment pages instead of the original post to which they belong. Like 404 errors for example
- This standalone attachment appears out of context, and a visitors landing on the image or attachment page are likely to close the link and move away.
- It’s possible that Google may index all the image files and consider it as duplicate content.
Finally, there’s also a niche situation where access to content in pages and posts is restricted by a password. It may happen that someone shares your images on social media. By clicking on the image URLs, an unauthorized visitor may be able to access the media content within these posts or pages despite not knowing the password.
You can help your readers skip these attachment pages by redirecting them to the post or page that they belong to by enabling the options here.
Keep in mind that this redirect option will only work if the media item was uploaded to the original post in the first place.
Default Redirection Type
Here you can select the redirection type that you would like to be used as default. Available options are 301 (permanent) and 302 (temporary).
A 301 is a permanent redirect and this type of redirect passes 90-99 percent of link juice (ranking power) to the redirected page.The number 301 refers to the HTTP status code, which informs search engines that a page has been moved. In most cases, a 301 redirect is the best method of implementing redirects on a website.
A 302 redirect is a temporary redirect and passes 0 percent of link juice. In most cases, it should not be used.
Still haven’t found what you’re looking for?
Let us know and we’ll do our best to help out!